CentOS Router Configuration for a Web Server
I wanted to follow up a previous post, where I described the process of configuring a CentOS router for the intention of creating a separate, internal LAN. There we simply deployed a router to separate an external WAN from our LAN and configured the router to pass along all traffic between the two interfaces.
This time I wanted to deploy a router for the purpose of serving content from an internal web server, to an external LAN or WAN.
While this is something that I used recently for a local hackathon, I believe it has greater “real world” application, and can be modified only slightly to accommodate the deployment of other services or applications.
Network Topology
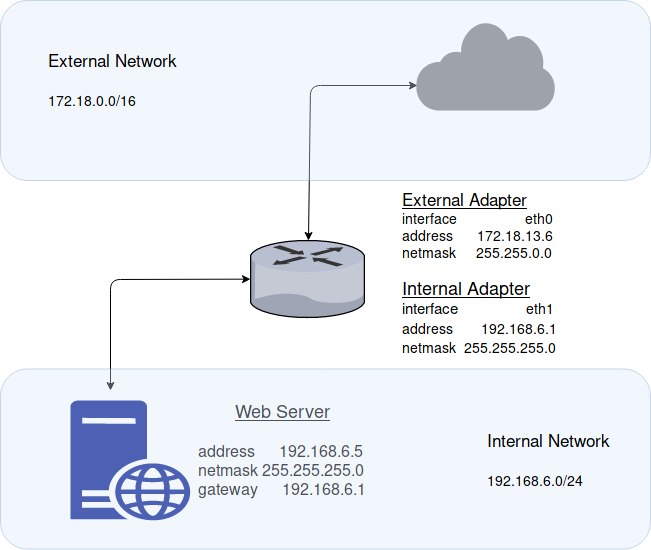
For this demonstration we’ll be using external network 172.18.0.0/16 and internal network 192.168.6.0/24. The router’s external network adapter will occupy address 172.18.13.6 and the internal will occupy address 192.168.6.1.
Please feel free to adjust you network addresses as you see fit, and as required by your network topology.
CentOS Router Configuration
We’ll be using a two network adapter setup for our CentOS router; one for the internal network, and the other for the external. Network Address Translation (NAT) will be configured on the router, as well, to handle incoming traffic from the external adapter to the internal LAN.
Step One – Configuring the External Adapter (eth0)
Network interface configuration files for CentOS can edited within:
vim /etc/sysconfig/network-scripts/ifcfg-<adapter>
The external adapter (eth0) configuration file should look something like this. Be sure to specify the BOOTPROTO, ONBOOT, IPADDR, NETMASK, & ZONE.
TYPE=Ethernet
PROXY_METHOD=none
BROWSER_ONLY=no
BOOTPROTO=static
DEFROUTE=yes
IPV4_FAILURE_FATAL=no
IPV6INIT=yes
IPV6_AUTOCONF=yes
IPV6_DEFROUTE=yes
IPV6_FAILURE_FATAL=no
IPV6_ADDR_GEN_MODE=stable-privacy
NAME=eth0
UUID=2e4eb124-bfe2-45de-aca8-9ae3f5fa487b
DEVICE=eth0
ONBOOT=yes
IPADDR=172.18.13.6
NETMASK=255.255.0.0
ZONE=external
DNS1=8.8.8.8
Step Two – Configuring the Internal Adapter (eth1)
vim /etc/sysconfig/network-scripts/ifcfg-eth1
Ensure the configuration file for the internal adapter looks similar to below. Again, edit all the relevant fields as was done above, and be sure to include a gateway that matches the address of the external adapter.
TYPE=Ethernet
PROXY_METHOD=none
BROWSER_ONLY=no
BOOTPROTO=static
DEFROUTE=yes
IPV4_FAILURE_FATAL=no
IPV6INIT=yes
IPV6_AUTOCONF=yes
IPV6_DEFROUTE=yes
IPV6_FAILURE_FATAL=no
IPV6_ADDR_GEN_MODE=stable-privacy
NAME=eth1
UUID=b3804ef1-084f-45f3-b352-4bf83ed171ba
DEVICE=eth1
ONBOOT=yes
IPADDR=192.168.1.6
NETMASK=255.255.255.0
GATEWAY=<IP address of NAT adapter / eth0>
ZONE=internal
Step Three – Restart Network Service
sudo systemctl restart network
Step Four – Enable IPv4 Forwarding
In order for this all to work, we of course must enable IP forwarding on the CentOS machine. That can be done by executing the following line:
sudo echo "net.ipv4.ip_forward=1" >> /etc/sysctl.d/ip_forward.conf
And to activate IPv4 forwarding immediately, execute the following:
sudo sysctl -p /etc/sysctl.d/ip_forward.conf
Step Five – Firewalld Configuration
Now, we can begin shaping the Firewalld rules to enable NAT between our network adapters and forward all traffic bound for TCP port 80 & 443 to our internal web server.
firewall-cmd --permanent --direct --passthrough ipv4 -t nat -I POSTROUTING -o eth0 -j MASQUERADE 255.255.0.0/16
firewall-cmd --change-interface=eth0 --zone=external --permanent
firewall-cmd --set-default-zone=internal --permanent
firewall-cmd --complete-reload
sudo systemctl restart network && systemctl restart firewalld
firewall-cmd --zone=external --add-forward-port=port=80:proto=tcp:toport=80:toaddr=192.168.6.5 --permanent
firewall-cmd --zone=external --add-forward-port=port=443:proto=tcp:toport=443:toaddr=192.168.6.5 --permanent
Step Six – Restart Network and Firewall Services
sudo systemctl restart network && sudo systemctl restart firewalld
Configuration of Internal Web Server
Simply all that is left to do is to ensure the working internal web server’s network adapter is properly configured.
Ensure the network adapter is statically configured for IP address 192.168.6.5 (or whatever your network topology requires) and ensure the gateway is configured pointing to your internal router; in this case 192.168.6.1.
Final Thoughts
The router should now be configured! To test the setup you can try to access the internal web server’s content from a machine on the external network (172.18.0.0/16, in this case).
As you can probably see, this setup can easily be modified to accommodate the deployment of additional internal services (SSH, FTP, etc.) quite simply by adding additional port-forwarding rules.